larryo
Weekender RV’er
 
Posts: 82 
|
Post by larryo on Sept 9, 2015 21:32:37 GMT -5
We have only had our TT a couple of months now, but I decided to make two mods to it right away. I am 6'3" tall and the bed in the TT is too short. My feet hang off the end. We initially put a queen size foam topper on top of the mattress, but since it extended over the end of the mattress it added length but no support at the foot of the bed. So I decided to install an extension to the bed. I made the extension (7") so that any weight put on it was transferred to the floor. It is also hinged so we can still access the under bed storage.    The second mod was to mount the TV so it would tilt and swivel but also lock in place when traveling. We bought a 24" flat screen TV and a Master Mounts locking wall mount. The mount locks in place with a spring loaded pin for travel.  5 April 2016 Getting ready for our next road trip to Florida. I've made two more improvements to our Showstopper. The original kitchen water faucet, for lack of a more politically correct term, is cheap and flimsy. So I found this one, on sale, at Camping world.com www.campingworld.com/shopping/item/single-lever-kitchen-faucet-with-pull-out-spray-white/74348Unfortunately the price has gone up since I purchased mine. This is how it turned out.  ![]() 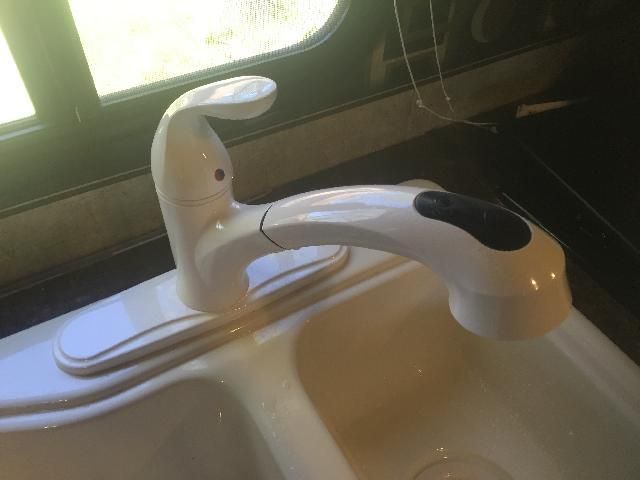 Next, since kitchen counter space is limited, I built a removable extension that I can install when needed. 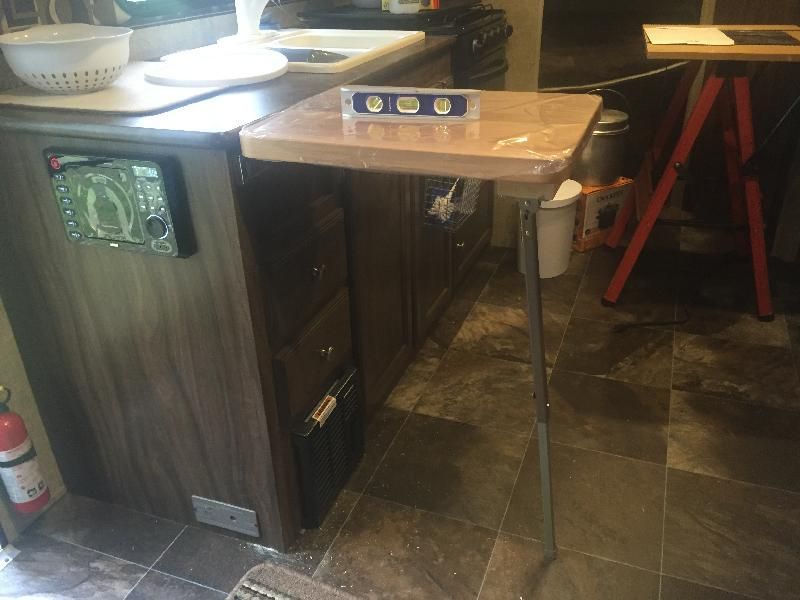 I still have a couple of ideas I will be working on in the future. |
|
|
|
Post by wolftrax on Sept 10, 2015 6:41:54 GMT -5
I am also 6'3" and was looking to extend the end of the bed similar to what you did, I like your mod and will probably do the same thing! Thanks for the picture. We purchased the upgraded mattress with ours so I will use a 7" foam piece on the head end to "extend the mattress" the additional 7 inches. What are the legs you used?
We just put in a very similar TV mount last weekend, found a stud using a stud finder and used 1 1/2" screws to mount it so we didn't go into the fridge. Didn't really notice any kind of real backing there except for the stud I found.
|
|
larryo
Weekender RV’er
 
Posts: 82 
|
Post by larryo on Sept 10, 2015 8:30:48 GMT -5
I am also 6'3" and was looking to extend the end of the bed similar to what you did, I like your mod and will probably do the same thing! Thanks for the picture. We purchased the upgraded mattress with ours so I will use a 7" foam piece on the head end to "extend the mattress" the additional 7 inches. What are the legs you used? We just put in a very similar TV mount last weekend, found a stud using a stud finder and used 1 1/2" screws to mount it so we didn't go into the fridge. Didn't really notice any kind of real backing there except for the stud I found. The legs are 1/2" galvanized pipe threaded into a floor flange mounted to the underside of the extension. Got the parts at Lowes. The "feet" of the legs are the rubber tips used on a cane or walker, got these at Walmart. I used a foam piece at the head of the mattress as you described above. Larry Note: one other mod I did, but didn't mention before was to install a partition under the lower bunk bed to protect the hot water heater. This allows me to use that area for additional storage. |
|
|
|
Post by wolftrax on Sept 10, 2015 14:09:46 GMT -5
Thanks for the parts description for the legs, that will work perfectly!
Good idea for the area under the lower bunk, I can see where the HW heater could be damaged by anything stored there. I am doing something similar under the master bed so we can keep the outside storage separated from the items placed under the bed.
|
|
larryo
Weekender RV’er
 
Posts: 82 
|
Post by larryo on Apr 5, 2016 21:29:18 GMT -5
I just added a couple of Mods to my original post.
|
|
larryo
Weekender RV’er
 
Posts: 82 
|
Post by larryo on Jul 22, 2016 21:21:08 GMT -5
This past spring I finally got around to implementing a couple of Mods I have been thinking about. In a previous post, I described how I extended the bed frame to accommodate my height (the "short" RV mattress had my feet hanging out over the end of the bed). This Mod worked fine for an interim fix. The lack of places to sit in the TT was one of the things my wife and I wanted to address. Sitting in the slide out dinette was OK for having a meal but was not conducive for watching TV (The TV is mounted on top of the pantry so one of us always had the TV behind us) Another issue I had with the bed was the under bed storage. I don't know how others use this storage space but I found lifting the foot of the bed to access storage to be very inconvenient and difficult. The two gas springs KZ had installed did not even begin to hold the lid open. I was able to correct both problems with one Mod. I removed the portion of the bed platform at the foot of the bed. I then built a new platform that incorporated the previous bed extension and added two drawers in place of the open storage. 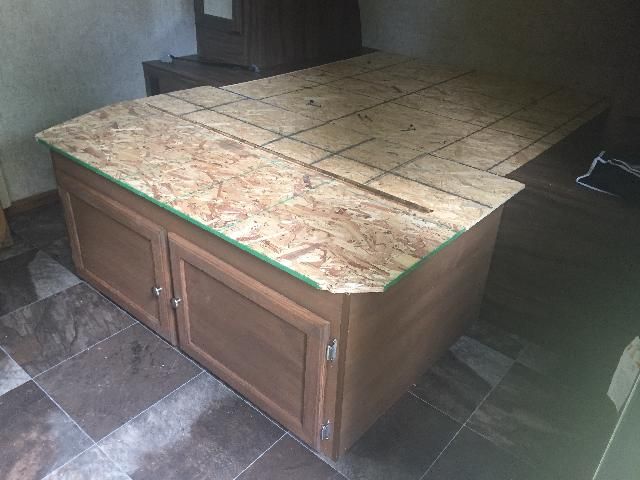 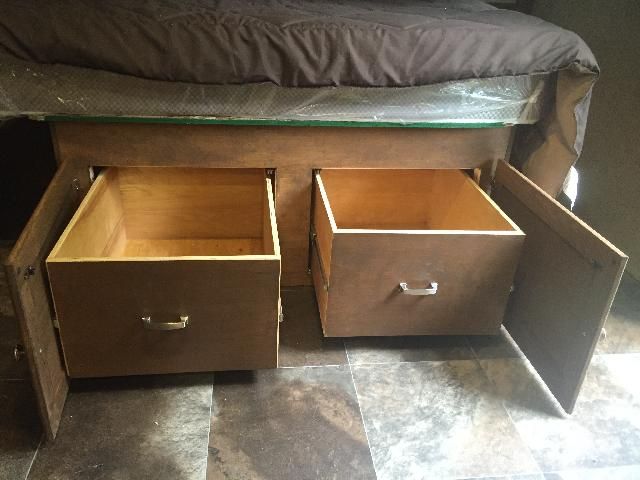 As part of the new bed platform, I incorporated a bench to sit on. To make this bench seat usable I built a hinged platform for the mattress that is held in the up position by 2 120lb gas springs. Now, when we want to watch TV, I lift the mattress to the up position and lift the bench backrest into place add a couple of cushions and we are good to go. When its time for bed we reverse the order. 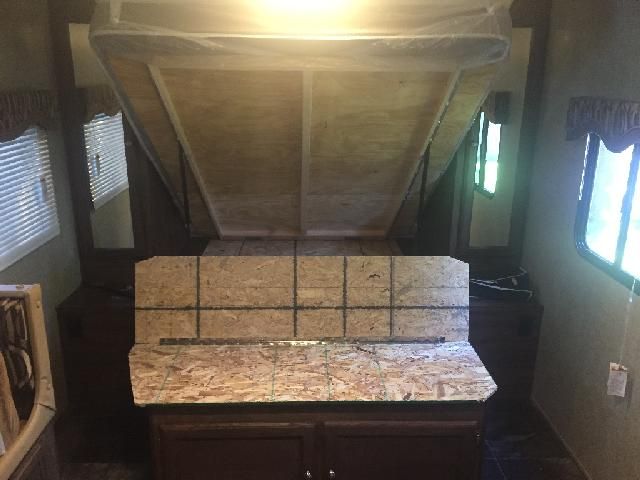 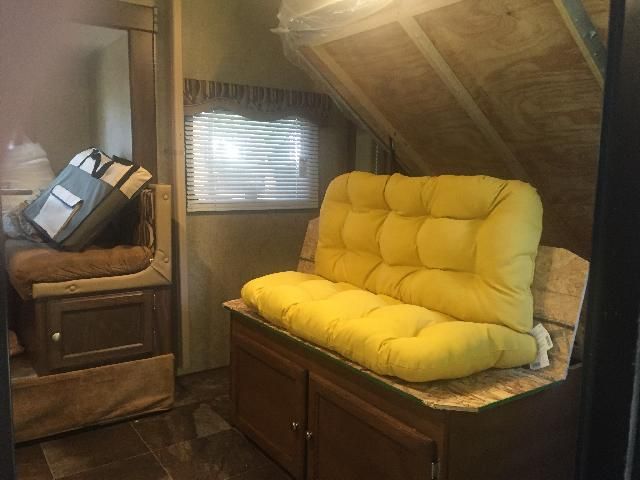 These Mods added less than 70 lbs to the total weight of the trailer which in my case is acceptable due to what I have gained. So far this has worked well for us. |
|
|
|
Post by larryg on Jul 25, 2016 9:29:38 GMT -5
larryo, I like this and have a 2010 version of this and agree the dinette is bad and was thinking of some kind of seating here.
what gas springs did you use? part number or at least length
|
|
|
|
Post by johnr on Jul 26, 2016 6:54:45 GMT -5
larryo, could you put some kind of rubber strip or sleeve over the plywood edges? It looks like you could end up cutting yourself or cause an abrasion when moving around. Maybe a Rubber U-channel? |
|
larryo
Weekender RV’er
 
Posts: 82 
|
Post by larryo on Jul 26, 2016 18:55:24 GMT -5
larryg - I bought the gas springs on eBay - 30.9” 120# NP Gas Shock Prop Strut Spring Lift Rod Damper Assist Tube 10x22mm. If I were to do it again I would probably get a spring that has slightly less pressure (110lbs?) because it takes quite a bit of effort to lower the bed. However, when it is in either the up or down position, it stays there.
The trick is finding the correct positions to mount the springs. I had to layout the design to scale to take into account the hinges for the bed and the position of the attachment points for the up, down and transition of the springs. Being a retired Mechanical Engineer, I had some experience to fall back on
johnr - when the mattress is in place it extends beyond the edges of the platform just like it did in the original version. Even in the up position it would be very difficult to scratch yourself on an edge. But thanks for the observation anyway. I plan to radius the corners of the "bench" panels
The only negative feature I have noticed so far is when the bed is in the "up" position, the bedspread touches the lens of one of the overhead lights. In my case this is not a real issue because I have changed all of the interior lighting to LED bulbs so the lens does not get hot.
|
|
larryo
Weekender RV’er
 
Posts: 82 
|
Post by larryo on Apr 6, 2017 10:25:24 GMT -5
One of the things I didn't like about our Sportsmen Showstopper was the U shaped dinette in the slide-out. For me, trying to seat four people in the dinette for a meal was inconvenient and uncomfortable. In addition, the table top was small (26" x 27"). 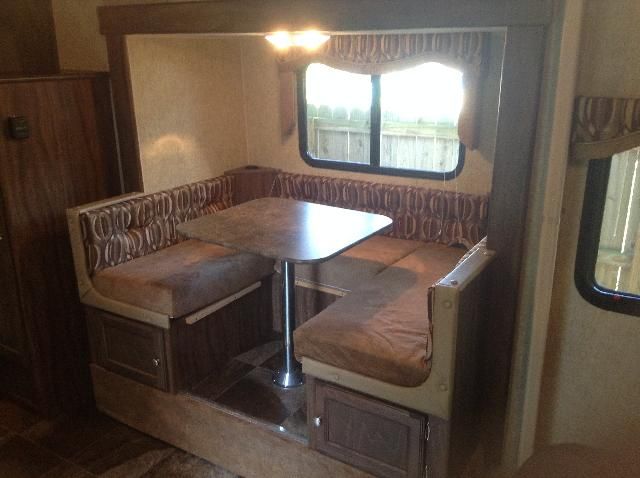 Upon looking at the design of the dinette closer, I discovered that if I removed the seat cushion, the panel underneath (under the window) and the vertical partition between the two sides, I would then be able to install a larger table. Fortunately, the floor covering, side wall covering and the panels for the two side benches extended under the old seat. Therefore, I decided would able to install a second table leg and a larger table top with minimal effort. It turned out that the most difficult part was finding or making a table top that was the correct size. I needed a table top that was exactly 26" wide (so i would work when I wanted to convert the dinette into a bed), 3/4 " thick and approximately 42" - 45" deep. Initially I did not find a table top that exactly fit my requirements, So I considered ordering a custom made top (very expensive), buy a table top that was oversize and modify it to my dimensions (also expensive and final quality questionable) or make a top myself. I decide to do one final internet search and happened to come across a site that had a table top that was the correct size (26" x 43" x 3/4" thick) and the price was reasonable. I ordered a table, which included a table leg and upper/lower fittings (it turned out leg that came with the top was too short for my application so I had to buy a longer leg). Total cost of the conversion was less than $125. 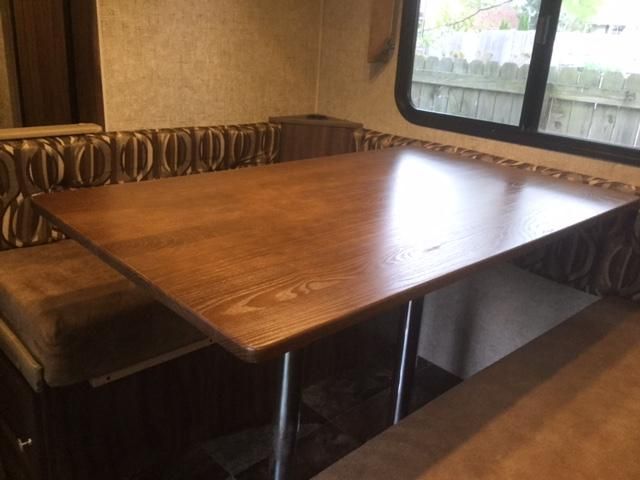 I think it turned out great. The only thing I lost was the small amount of storage that was under the seat by the window and I didn't use it anyway because it was so inaccessible. |
|
larryo
Weekender RV’er
 
Posts: 82 
|
Post by larryo on Jul 18, 2017 18:21:16 GMT -5
Well, I've been adding Mods/Improvements to my 26ft Sportsmen Showstopper again (It keeps me from getting bored in my retirement) 1. The lower bunk is fine. We've had guests use it and have had no complaints. However, the upper bunk seemed like a cave to me and also to my granddaughter that had to sleep up there one time. So, after careful study and planning I decided to add a window. It's smaller than the one in the lower bunk (12x24) in order to preserve as much structure as possible, but it provides adequate lighting and ventilation.   2. My TT has the standard overhead non-ducted Coleman Mach Air conditioner. When the AC or aux heat element (which I had previously added) are selected, the fan runs ALL the time. Even when the compressor disengages, the fan runs, it's annoying. So, I began researching on the internet to see if I could add an external thermostat that would allow the AC or aux heat to cycle when the desired temperature is achieved. I found one YouTube video and a couple of posts on various RV sites. I then searched for parts and found that I was able to find a thermostat and a control unit (made for the Coleman unit) that would do what I wanted. So I now have an AC system that functions like the system in my house. It also works with the aux heat element and also replaced the original thermostat for the propane furnace.    Overhead unit with old control knobs removed.  New Thermostat 3. And finally, just for fun, I added an underbody LED lighting system. I'd seen something like this on a couple of Class A RVs and thought it looked neat. Found a system on Amazon.com for less than $90. www.amazon.com/OPT7-Trailer-Underbody-Interior-Lighting/dp/B01M9IAT4CTook two short days to install, but for me, It looks good and was worth the money.    Well, that's all for now. Got a few more ideas for later. |
|
|
|
Post by johnr on Jul 19, 2017 6:50:04 GMT -5
That light kit looks pretty cool! Did you wire it to the fuse box or straight to the battery?
|
|
larryo
Weekender RV’er
 
Posts: 82 
|
Post by larryo on Jul 19, 2017 15:17:12 GMT -5
That light kit looks pretty cool! Did you wire it to the fuse box or straight to the battery? Before I answer your question, let me explain a few observations I've made about this system. First, It appears that the product is primarily made for automobile usage. This particular kit is marketed towards the RV industry. I say this because while the LED light strips are weatherproof, the other components are not. For example, the control box is a cheap plastic box and they state in the instructions that it cannot be installed in an area where it can get wet. They also suggest coating the connectors in silicone. On the good side, they do supply 10 ft extension cables so I was able to easily mount the light strips on the underside of the trailer and have enough cable length to reach the control box inside the trailer. I had to drill one hole in the floor to get the cables inside after which I sealed with weatherproof expandable foam. The kit includes a couple of options for power. 1. A car charger plug with on/off switch (this is what I used) 2. Direct fuse taps (I think these were meant to plug into a car fuse box) I chose the car charger plug option, because I had recently installed a 12V Socket/Dual USB Power Outlet Charger Adapter (https://www.amazon.com/gp/product/B01DXG2XKM/ref=od_aui_detailpages00?ie=UTF8&psc=1) near my entry door so I could charge my TPMS after a long drive. So now I use this outlet for the lighting too. Hope this helps. |
|
|
|
Post by jemer1 on Sept 24, 2017 10:06:21 GMT -5
That dinette conversion is a great idea. I also have a showstopper and would like to do the dinette conversion but I can't seem to find a table top with those dimensions. Do you remember where you ordered yours from? This family of 4 I'd tired of that tiny table.
|
|
|
|
Post by Chuck on Sept 24, 2017 12:21:42 GMT -5
Guy's
I think these are great idea's an if you had the time come to the kz Rally next year an show the people
at Kz your idea's so they could make improvements in the future to trailers after seeing what you have dome :0
Safe Travels
Chuck
|
|
|
|
Post by newyear58 on Feb 7, 2018 12:29:36 GMT -5
I didn't like the standard table so I built a new one for my 2018 191BH.   |
|
|
|
Post by lynnmor on Feb 7, 2018 15:34:04 GMT -5
Great first post, maybe you could elaborate on how it was built. My table is taking the shape of a potato chip and needs replaced. If your old one is for sale, that would bail me out till I get, or build, a better one. |
|
|
|
Post by newyear58 on Feb 7, 2018 18:35:30 GMT -5
Lynnmor, I don't use any plans, I just get a thought and go into my shop.Then I start looking at what I have to build with and then start.To tell how I did it, well no I can't.The old one is just there for now until I decide what to do with it. I live in Pa. so if you want to buy it we can talk.my e-mail is in here. Subject it camper table so I don't trash the e-mail. E-mail is newyear58@gmail.com
|
|
larryo
Weekender RV’er
 
Posts: 82 
|
Post by larryo on Mar 12, 2018 20:02:15 GMT -5
|
|